


As of late we have been running more and more projects using the Agile Scrum method. In fact, our largest projects are almost all conducted in multidisciplinary Scrum teams. And very successfully! Formerly we primarily worked using the Waterfall project methodology, so we had to adjust our workflow. Gradually we have developed an effective way of working for interaction and visual designers within Scrum projects.
Design workflow tools
In order to make the workflow more iterative and effective our two design disciplines at UNITiD – the interaction designer and visual designers, collaborate using our favorite design tools: Sketch, InVision, Keynote, Dropbox, Jira, Confluence and our own Front End Guide. A central role is given to the backlog in Jira. We organize the files, folders and other design tools based on the user stories structure of epics in Jira. Together with Confluence we communicate and collaborate with the engineers. Throughout this article we will share our ‘take-aways’ for each tool.
1. Jira
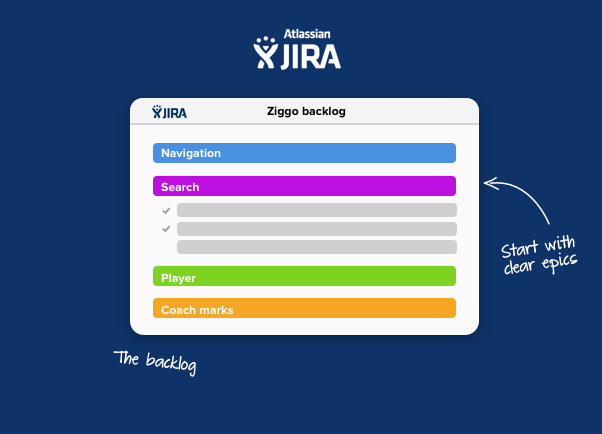
Online tool Jira by Atlassian containing the project backlog with the stories sorted by priority and grouped into the epics. We also use the Jira Scrum digital Scrum board to visualise the progress of the stories.
For who?
The whole team: developers, testers, the product owner, the Scrum master, interaction and visual designers.
Take-ways for setting up the Scrum project in Jira
- Create epics to group related stories. This is an essential part of the process: epics determine the structure within all tools and folders you will use.
- Link the epics in Jira to the documentation in Confluence on the relevant epic.
- Always start the name of an epic story with a <epic> – <description story>. For example:
“Search – ability to delete recent search queries. Epic labels are only visible on the Backlog; this way of writing also keeps the Scrum board organized. - Describe a story as specific as possible from the user perspective. This is done according to the format of a user story:
“As a user .., I want to …, so that …”. - Describe a story acceptance criteria according to the following format:
“Given … When … Then …”. This way it can be tested effectively and properly. - Create the stories with a multidisciplinary team that includes a designer, a developer and a tester. This way all disciplines in a Scrum team are aware of the design and specifications of the story before the sprint planning.
Although Jira offers a digital Scrum board, it can also be very useful to have a physical Scrum board on a wall for a total overview. A disadvantage is that you will need to keep your tasks up-to-date in two places – in Jira and on the wall.
2. Dropbox
Dropbox is our central file repository which the whole team can access at any time and location.
For who?
Interaction designers, visual designers, front-end developers and project managers from UNITiD.
Take-aways for setting up the Scrum project in Dropbox
- Create a separate project folder in Dropbox, preferably using a professional Dropbox account for the increased storage space and better sharability.
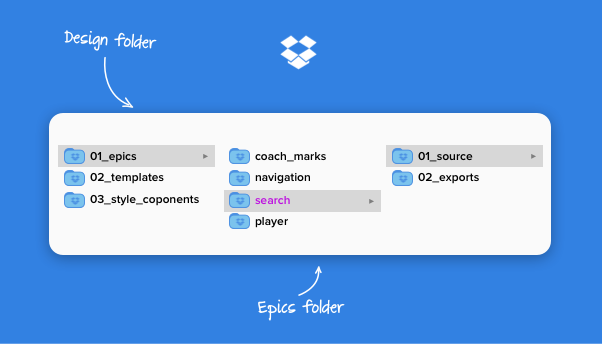
- Create a single folder called, for example, ‘design’ for both interaction design and visual design files. If you collaborate in, for example, Sketch, store the source files and the exports in the same folder and not in two separate folders for the interaction and visual design.
- Structure your ‘design’ folder with the subfolders as:
- 01_epics
We used to create separate folders on a story level. It proved to be too granular which resulted into too many folders and overlapping Sketch files. By bringing back folders to the epics level, we now work out related stories in one Sketch file. - 02_templates
Because we design based on the user stories, we design page templates piece by piece. It is important to eventually bring all pieces of a template together in one Sketch file. - 03_style-components
In this folder we place a single Sketch file with design of the reusable elements such as the style tiles.
- 01_epics
- Structure each ‘01_epic’ folder as:
- 01_source
Place the Sketch source files for both interaction and visual design in this folder. Store the outdated versions in the ‘archive’ folder. - 02_exports
Place exports of the design in this folder in a sharable flattened format like .png. Preferably for each individual story. We create a new folder for every version version and simply name them ‘exports_01’, ‘exports_02’, etc. Add one ‘approved’ folder for the final version. We used to specify the date in the folder name, but found the date was irrelevant information. We do separate wireframes and visual design mockups within the export folders.
- 01_source
3. Sketch
Sketch by Bohemian Coding is a vector-based design application (currently Mac only). We use this software to visualise our screen designs – wireframes for the interaction design and visual mockups for the visual design. Read our earlier post on Designing in Sketch.
For who?
Visual designers and interaction designers.
Take-aways for working with Sketch
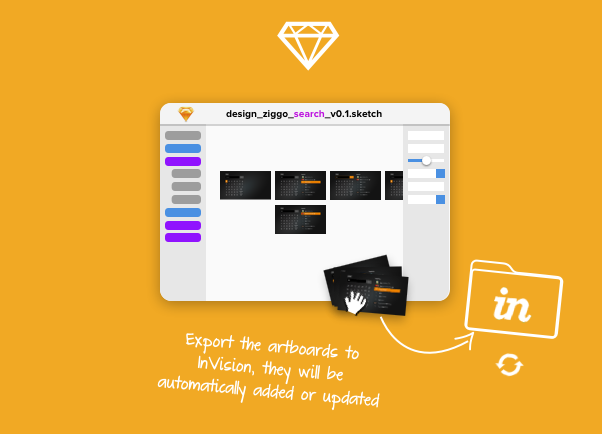
- Create a separate file per epic. Name each file using the following convention: “visualisationtype_client_project_epic_versionnumber.fileextension”. For example:
- wireframes_ziggo-sgui_search_v0.1.sketch
- visuals_ziggo-sgui_search_v0.1.sketch
- Keep the Sketch source files per epic in the ‘00_source’ folder in the ‘epic’ folder.
- Create multiple artboards in Sketch within a canvas and use the part of the epic, followed by the state and version in the title of the artboard: ‘seach/results_v0.1’. If you use a ‘/’-character, Sketch automatically places the exports in a separate folder.
- Name (groups of) artboards and -where needed- add descriptions inline to keep a large canvas organised and comprehensible for your team members.
- If you have multiple iterations, duplicate your artboards and present them next to each other on the same canvas to see the differences.
- If you use InVision for creating interactive prototypes and for reviews, drag-and-drop the Sketch file directly to the InVision project page. Alternatively, export Sketch files in the Invision-folder (in the ‘Apps’ folder in Dropbox). Ensure you keep using the same file-names if you want to overwrite the older versions. You can view older versions within InVision’s history. We will tell you more about InVision later in the post.
Take-aways for the delivery
- In the end of the project incorporate all final page mockups and assets in two Sketch files:
- One file for all page-level templates to the folder ‘01_source’ within the folder ‘02_templates’.
- One file for all assets and style elements to the folder ‘01_source’ within the folder ’03_style_components’.
4. InVision
Invision is a online tool for rapid prototyping, for presenting and collecting feedback on the screen design. InVision is our vehicle for presenting the progress of the design to the stakeholders. Read more about our experience with InVision in the post about our ‘best practices’ voor InVision.
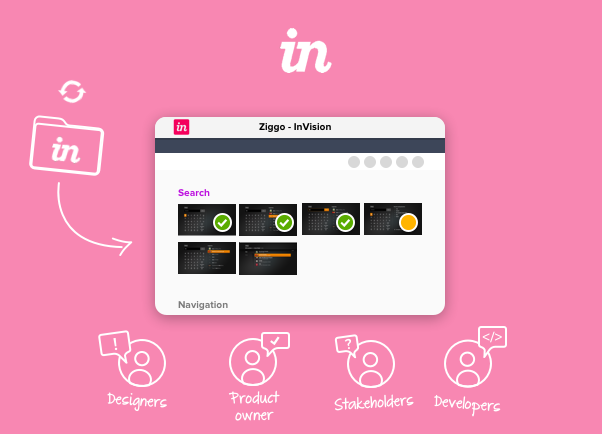
For who?
Visual designers, interaction designers, the product owner and all business stakeholders.
Take-aways for remote communication with InVision
- Link your InVision-project with Dropbox. This way, when you export your page mockups to your InVision folder on Dropbox, your files are automatically uploaded to your InVision project.
- Structure your InVision folder with the same ‘epic’ folders as on Dropbox.
- Group your mockups in InVision per epic using the sections.
- Give access to your stakeholder so they can view the progress.
- Annotate your design in InVision and ask for feedback using the commenting tools within InVision. Manage the notifications about the feedback by assigning them to the right people.
- Upload newer versions of the exported screens with the same file name. Older versions remain available in InVision version history.
- Assign a status to pages such as ‘In progres’, ‘Needs review’ or ‘Done’ in InVision to keep the overview of the progress.
- Archive approved design as they are not relevant for the reviews any more. Document the approved design in Confluence.
- Hide (minimise) the sections which are approved and move them down the list to keep them out of the way for reviewers.
- Place the epics that require a review on top of the InVision project list for quick access for reviewers.
- Create an ‘Assets’ folder in InVision to store the presentation files.
Take-aways for the review meetings
- Present your design directly from InVision so that you can:
- Record the important decisions directly in the InVision comments
- Change the status of the design directly in InVision.
Take-aways for prototyping in InVision
- Create an interactive prototype in the ‘Build’ mode by drawing clickable areas.
- Use an additional URL generated using the ‘Share’ functionality for the usability testing and for the feedback to keep the prototype clean from the comments, etc.
- Share the link of the 1st page of the prototype.
- If you have multiple prototypes for a project, create an additional ‘index’ image with multiple clickable hotspots to help users navigate the prototypes.
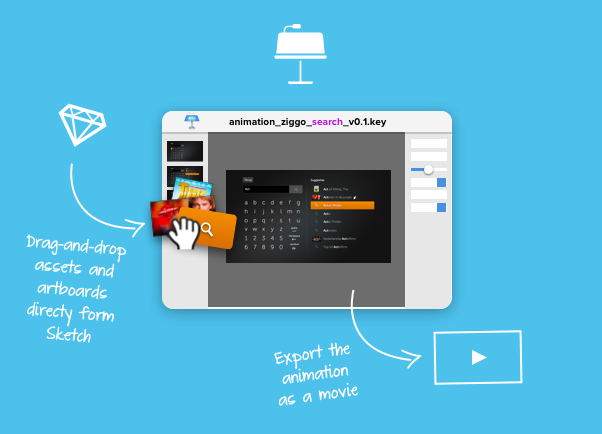
5. Keynote
Keynote is a tool by Apple for presentations and prototypes, including animated transitions.
For who?
Visual designers and interaction designers.
Take-aways for the presentations with Keynote
- Create a presentation per design review and save it in Dropbox, in the folder ‘05_presentations’ / ‘sprint_n’ / ‘week_n’.
- Start each presentation with a slide showing the backlog and visualise the status of individual stories:
- Design Done
- Design In Progress
- Problem to finish user story
This way you make the design progress clear for the stakeholders.
- Make an export of the final version of the presentation in .pdf and upload it to InVision in the folder ‘presentations’ within the ‘Assets’ directory.
- Present your design per story, in the order of the backlog. However, if you have multiple stories from the same epic, present them next to each other and not necessarily in the order of the backlog.
- After the meeting, also add a copy of the presentation in .pdf to Confluence.
Take-aways for rapid prototyping in Keynote
- Copy-paste layers, groups, symbols and artboards from Sketch to the Keynote. Everything you copy will keep its resolution and transparency.
- As all elements will become separate layers add transitions to the elements in Keynote creating animated prototype.
- As it is not yet possible to import animated Keynote to the InVision, export your animations as a movie and add them in the ‘Assets’ folder in InVision.
- Add approved animated transitions as movies to the Confluence.
6. Confluence
Confluence is an online wiki-like tool from Atlassian for project documentation, meeting notes, team information, etc.
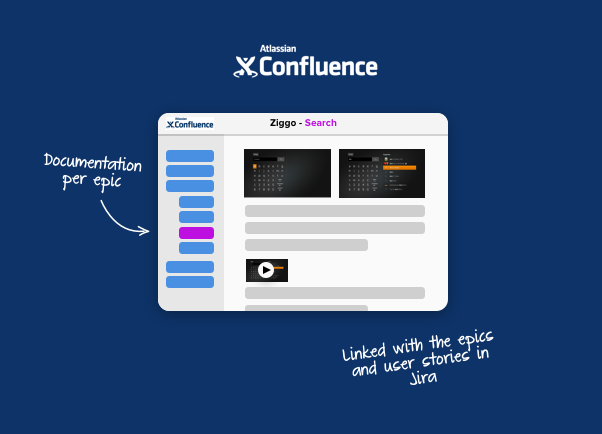
For who?
The whole team
Take-aways for documentation
- Create a separate area for design reviews. Use the following page names: ‘date_meeting type_sprintN_weekN’ and use the page template as:
- People presents (use Confluence people tagging)
- Goals of the review
- Actions (use Confluence people tagging)
- Presentation in .PDF
- Create a separate section for ‘design’ with the epics, similar to the structure in Dropbox and InVision and structure your content on a page like:
- Introduction
- Status
- Rules
- Assets
- User stories
Link the user stories to the epics in Jira. Jira will display the status of the stories automatically.
- Support textual documentation with the visuals. InVision has a feature that allows to embed InVision screens into the other online tools like Confluence. This way, as soon you update the images in InVision, they will be automatically updated in Confluence.
- Separate Confluence pages in ‘approved’ and ‘draft’ status to make clear which are ready for development.
- Create a separate Confluence page for the templates, similar to the one in Sketch and in Dropbox.
- Use Confluence pages as the design specifications for the project.
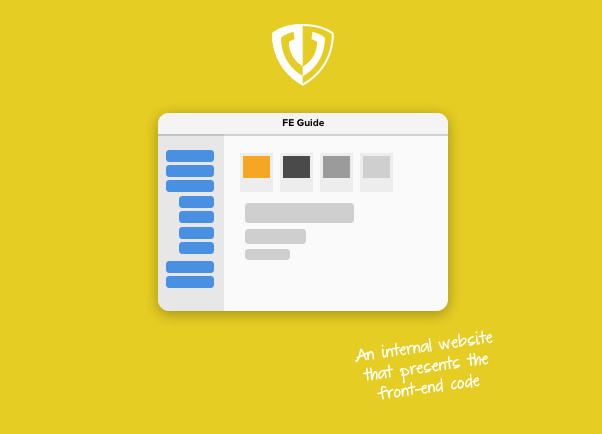
7. Front-end guide
A Front-end Guide in an internal website that presents the front-end code to all stakeholders. Read more about importance of a Front-end guide in this post by the Voorhoede ‘Relevance of a solid Front-end Guide’.
For who?
The whole team.
Take-aways for the testing with the Front-End Guide
- Collaborate closely with the front-end developers and test the designs in actual html, in multiple browsers and actual devices as soon as possible. This will provide you early insight on how well your designs perform and where they still need improvement.
- Use software tools like Ghostlab for testing on devices. It gives you the ability to simultaneously view and debug a page in real time on multiple devices.
- Use physical tools, so called Device Labs, like the one created by us at UNITiD or one by Ghostlab, when you test on the real devices. Device labs streamline the testing process by simplifying presentation, charging and rotation of the multiple devices at once.
Take-aways for communication with the Front-end Guide
- Publish all front-end code (html, css, javascript) in a Front-end Guide that reflects all individual components and they composition within ‘views or ‘templates’. This is a valuable tool for the designer’s and stakeholder’s understanding of the project progress, as they can view the latest version of every page conveniently in their own browsers. This is great for reviews, presentations and (user) tests.
- Build a code-based styleguide in the Front-end guide which visualises the colors, icons, text styles and form elements used in the project. It offers a clear single overview of the style guidelines in the browser for the team, as well as others who need to reuse the styles outside the project.
- Set up a Front-end Guide as a living document. Keep the front-end code up-to-date with the latest production code, so it could be used and shared across projects.
Continuous improvements
While we are satisfied with our workflow today, we are constantly looking for the ways to improve it. Each project is different. Sometimes we, for example, structure a project around components in place of epics. Also in case of separate apps for different platforms within the same project, the file structure will be more complex.
We are happy with our new tools – Sketch and InVision and use them on almost all our projects. We design faster together in Sketch and take decisions faster with InVision.
Also the new software updates will further streamline our workflow. Soon we will be able to specify directly in the Sketch source file which artboards need to be in InVision without exporting them first as flattened images. In this case we could use the InVision folder as the design folder.
What is your favourite Scrum design tool?
Is your favorite Scrum design tool missing from our list? Do you approach your design work differently in Scrum projects? Share your experience in the comments below!
Geplaatst om: 23:49 op 6 April 2017 :
6 April 2017 op 23:49:
I’d suggest putting images as dropbox links on Confluence user stories, so every time you update images on your dropbox the images will be up to date wherever it is.
Geplaatst om: 19:39 op 9 February 2018 :
9 February 2018 op 19:39:
Who creates the epics and user stories in Jira? Is it the UX designers?
Geplaatst om: 15:24 op 15 February 2018 :
15 February 2018 op 15:24:
Hi Carlie,
Ideally the product owner creates (PO) Jira tickets and complete them with the team. But honestly this differs per project. It occurs that the (lead) designer is responsible for creating them and to complete them with the PO.
Epics should be created by the one who is responsible for creating JIRA tickets. But the system should be created in the start of the project together with designers and developers so it can be applied in their work.